

Photographic Check List for Motorsports
24 December 2023
In this article I will take you through my routine before, during and after taking motorsports pictures track side. I will take you through what I have in my bag and the settings I use to capture the images displayed on the PistonClick website. Detailed camera settings like aperture and f stop will not be included as it is very unlikely you will encounter the same lighting, weather, subject and location. This knowledge can only be gained by experience; juggle every day and you will be a good juggler, juggle once a year not so. However, we do have guides for basic motorsport settings to get you going here. Motorsport Camera Settings.
The day before I head out for a shoot I will check my lens optics for dust and marks, cleaning as required. A rocket blower to remove any dust and a lint free cloth. The correct way to use the cloth is to roll it to a point and hold it at one end, using a brushing motion with the pointed end. This prevents you from applying undue force on the lens which we don’t want to scratch.
It goes without saying, never touch your lens with your fingers as the oil on your skin loves to stick to lenses. For stubborn stains like water marks I use Residual Oil Remover (ROR trade name) which you can get from Amazon. It’s not cheap but is the best I have used so far for lens and sensor cleaning. However, there are cheaper alternatives. Remove any dust first before using any fluids on your lens.
Next I check for dust inside the camera. Dust on the mirror is not a problem, you might see dark spots in the view finder but none on the final image. However, these dust particles have no business being inside your camera and could end up on your sensor. Clean the outside of the camera so you don’t introduce more dust into the body of the camera. Take the lens off, turn the camera upside down and use a rocket blower to remove any dust and then check and repeat if required.
There are specialist tools you can use that have lights and magnifiers to view your mirror and sensor for dust, but I use an old school big magnifying glass.
Next is the sensor. I have lost count of the images that are sent to me which have dust spots all over them. Most people won’t notice them as they are generally shooting with a wide aperture which will blur them out but they are still degrading the image. When a lens is stopped all the way down and focused on a neutral subject you can see the dust spots. More on this later.
Checking my camera gear before an event
The first thing I will do before an event is to decide what camera gear I will need to take with me to capture the images I want.
This is determined by the assignment, Track side some locations only require a short lens, paid gig, grab the Pro gear, shooting for the site or shooting for fun I will sometimes pull old glass and bodies. My D3X is still one of the nicest cameras to use in my collection and will still deliver the goods.
First thing to make sure I have to hand are some or all of the following:
- Assignment contact details
- Media Pass
- Tickets if going as spectator
Generic packing list
Camera Bag
Camera body x 2
Mono pod with swivel head
Long lens (400mm minimum) with mono pod adapter
Medium lens 70-200mm with Black Rapid sling
Short lens 24-70mm
Tele-convertors x1.4 and x1.7
Flashgun with fresh batteries
Spare camera battery
Spare storage cards
Cleaning kit containing
Rocket blower
Sensor cleaning fluid
Sensor cleaning swabs
Lens cloths
Microfibre cloths
Small bag containing other items
Powerbank
Phone cables
Multitool (knife, screwdriver, pliers)
Aspirin / Ibuprofen
First aid plasters
Snack food / fruit / water
Large bag containing
Portable seat / small step
Waterproof lens covers
Hat and gloves (waterproof seal skin (brand name) are the best I have found ))
Waterproof gore tex jacket and trousers
Clean shoes (Its easer to change foot wear than clean mud from your car interior)
All of the above will go with me to the track but some items might stay in the car.

The Night before an assignment
Ensure the cameras and lenses are clean, batteries are charged and storage cards are clear and formatted in the camera you are going to use. Always format your cards in camera. I generally use a polarising filter which can be difficult to clean, so preventing it from getting dirty is the best policy. Ensure it rotates freely.
I will take a few test shots and change the file naming if required. I also check that the meta data I want on the images is correct.
Photographic Metadata
Metadata is not the most exciting subject and most amateur photographer will ignore it. Using metadata can be helpful and in most cases only needs setting up once. As a minimum I will have copywriter and contact details embedded in my images. This is accessed from the Menu > Setup Menu (Spanner) amend the Image comment, Copyright information and IPTC with the info you want to be embedded in your images.
The International Press Telecommunications Council (IPTC) uses news codes and keywords to get detailed and accurate descriptions about images in a standardised way. This ensures they can be easily and efficiently retrieved via online search engines, so are basically machine-readable code. This helps editors when searching for specific images.
In this example the code for super bikes is 15041009. Click the image to go to the IPTC website for other codes.

You can manually populate your camera with these codes, apply them in post processing or use software.
Nikon have a basic free to use and download IPTC Preset Manager here.
During post processing I will tag my images with specific metadata like the rider’s name so I can find them easily in years to come. Your Digital Asset Manager software (DAM) will have a help file on how to do this. I use Apple Photos, there are better DAMs out there but Ive been using Photos for ever and am kind of locked into it now and it works for me. Your DAM and Photo-editor will be able to display your metadata and possibly amend it.

Exchangeable image file format (Exif) data is auto populated to your images when you take the shot and has useful information like exposure and focal length, which is helpful when reviewing shots especially if you have a great shot and can’t remember the setting you chose to capture it.
I use Affinity Photo 2, I used to use Photoshop and I can also recommend Capture One and DXO Photo Lab. They all do the same thing more or less it all comes down to personal preference / price. Serif who make Affinity Photo have deals on throughout the year. You can get an Affinity Photo full licence for less than £30 if you time it right! Full price is £67.99 with free updates for the life of the program, usually about 5 years.
You can check that your copyright information and IPTC is also included at this point from dropdown menus under the metadata menu before you export your image from within your image manipulation software.

Check for sensor dust spots
It’s also a good idea to check for sensor dust spots at this stage. More on this later.
When I shoot trackside I will set a small aperture, say ƒ/22 and photograph something uniformly light twice, such as the sky.
I do this to speed up my workflow on my computer as it’s easy to see the start and end of a race when you are back in the studio reviewing your images using your DAM (I use Apple Photos as it integrates with Affinity Photo / Designer and Publisher). Remember I will also have changed the file name in-between races which will help if you are changing the meta data on the images
When you have shot different races, motorbikes classes can look very similar, so having two blank images is helpful. At this point, between races I can have a quick look at the two reference images for dust spots using the main camera display. They can be very hard to spot if you are shooting with wide apertures ƒ2.8 - ƒ5.6.
If required I will clean the outside of the camera and do a quick rocket blower clean. Cleaning your sensor trackside is not recommended and only do it if you have to. Removing dust spots from 3000 images is a pain.

Cleaning your camera sensor
Back in the studio is the best place to clean your sensor.
- Set your camera to aperture priority and select ƒ/22.
- Take a test shot using a long lens at a plain background.
- Load the image into your computer and check for dust.
The following images are the last shot I took (1), first dust test image (2), last shot with the test image overlayed at 50% transparency with the main dust spots circled (3). Results after a rocket blower clean (4) and a wet-clean with a sensor wipe (5). The dust test images were taken on a very dark overcast day and you can see the top of a roof in the last shot.
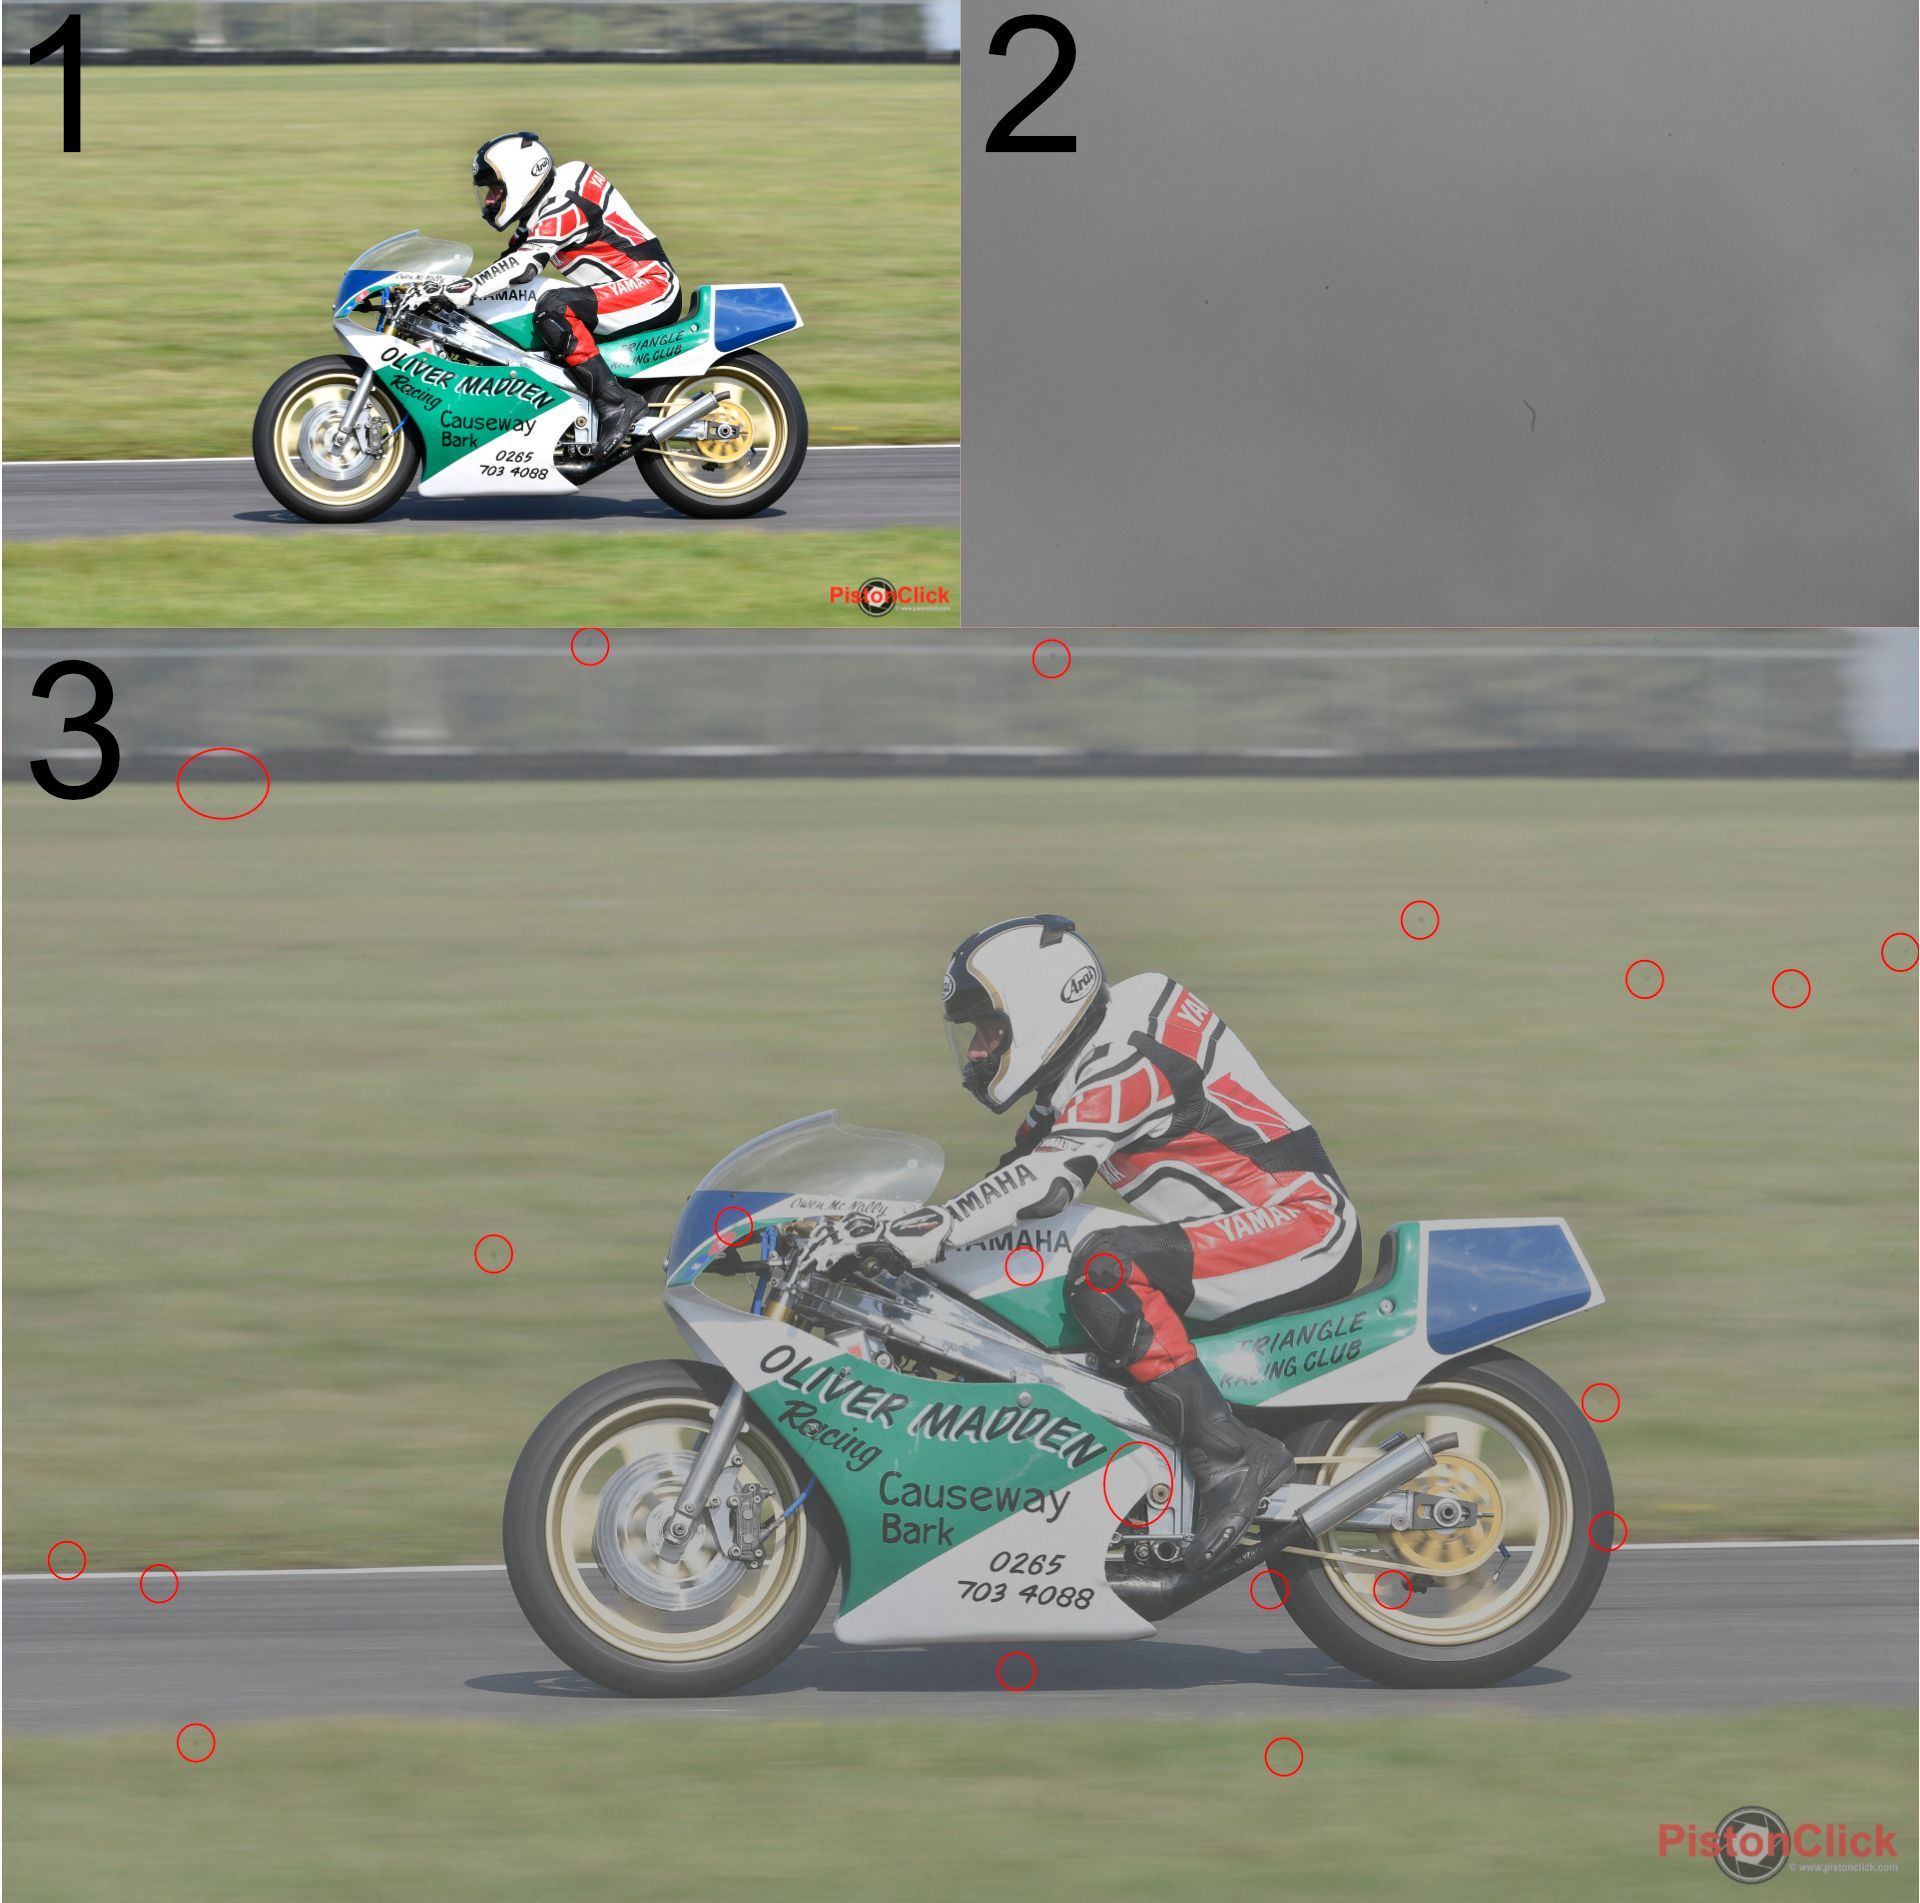


This is the process when you have found dust spots. Please take note you can damage your sensor if you get this wrong, so be methodical and be very gentle when wet-cleaning your camera sensor. Ensure your battery is at full charge or the menu options will be greyed out. A camera shop will charge you £30 - £50 for cleaning a sensor.
You will require a Rocket Blower, Sensor cleaning wipes, Sensor cleaning fluid.
The following is for a Nikon DSLR menu.
Menu > Setup menu (spanner) > Clean image sensor, the camera will try and clean your sensor. Take a test image and check.
Still have dust?
Remove the lens. Menu > Setup menu (spanner) > Lock image up for cleaning > press the shutter release . With the sensor facing the floor gently blow air from the rocket blower at the sensor. Take a test image and check.
Still have dust?
Menu > Setup menu (spanner) > Lock image up for cleaning > press the shutter release. Open a one use sensor cleaning wipe. Spray a very small amount of sensor cleaning fluid onto the wipe and gently guide it over the sensor. Take a test image and check.
You might have to do this a few times, only use the sensor wipes once. Wipes are cheap, sensors are not.

At the track
I will have checked my camera kit the evening before setting off for the assignment, but I also check again when I arrive trackside at the circuit. The switches on your lens can be moved
Set up your lens and camera and attach the mono pod or camera strap ensure all of the connections are tight and secure.
Basic checks track side using the Nikon D500 as an example
Battery Charged
Storage card in the camera
Storage Card formatted
Check the switch modes on the lens
- Auto Focus on (A/M)
- VR On (As required, Sport)
- ∞ - 5m (If shooting through fences)
- AF-On
Check the modes on the camera
- White Balance (Auto)
- Image Quality (Jpeg best)
- Mode (Manual)
- Exposure Metering Mode (Matrix Metering)
- Shutter Speed (as required)
- Auto Focus Mode (AF-C 25)
- ISO (Automatic)
- Exposure compensation (0)
Change the file numbering to reflect the job.
A paid gig or shooting for fun, I find as the shoot progresses changing the file naming makes it easer in post process to identify the subject. For example, on track days use the colours for the different groups, White WHT, Red RED etc. For British SuperBikes, BSB, SuperSport, BSS and so on. Also take a sky shot between different races.
After a race I will stop the aperture right down, f 22 expose correctly and focus at ∞ and take a shot. This will again identify different races quickly when post processing your images - lots of bikes, sky shot, lots of bikes sky shot. It also has the added benefit of showing any dust spots on your sensor that you might have picked up when changing lenses.

Motorsport lens settings in detail
Lens, check the switches on the lens are correct, Auto Focus, A/M (Auto/Manual) and M/A on a Nikon lens are the same, enabling you to grab the focus ring and adjust focus as necessary. A/M will require a little more force to move the focus ring. A/M is usually only seen on large Pro zoom lenses. M turns off the auto focus. I don’t use the M setting in motorsports.
If I am taking a pre-focused shot without auto focus I will use A/M to focus on a spot on the track and turn the A/F off on the camera. This switch is located just below the lens on the camera body. Or if using pro lenses there will be a buttons on your lens you can use to lock the focus or activate the auto focus (check your manual) I have mine to lock focus.
Most cameras will have S, Single focus, C Continuous (C is my default setting for motorsport) or M manual focus, or a button you press that enables you to select the setting via the rear control wheel.
Focus limit
When shooting track side you will at some point shoot through the safety fence. Check out our guide on how to do this.
Shooting through safety fences.
Most zoom lenses have a setting that restricts the minimum focus distance. On a Nikon it’s 5m. I leave my switch on the infinity to 5m, ∞-5m and this stops the lens focusing on the fence.
Vibration reduction
There is a section in our advanced motorsports photography guide on vibration reduction (V/R). Vibration reduction has been continually improved since its introduction, so depending on your lens and camera body combination, it will have different effects. The latest Nikon Z bodies will have extra in camera stabilisation F bodies don’t its all in the lens so depending on your lens camera body you will have different results.
On Nikon lenses that have V/R you can have On or Off, Normal or Active or Normal and Sport. V/R in a lens will stabilise the lens using small motors to hold the lens optics and therefore the image in the view finder stable. This reduces camera shake, producing sharper images and has the added benefit of a more stable image in the view finder. This is helpful when using long telephoto lenses as you can track a subject easer. Every motorsport photographer will have an opinion on V/R and how useful it is. Their opinion is determined by their experience of their lens camera combination which might not be the same as yours.
On an older Nikon lens you have Normal and Active VR. Active is used when in a vehicle and will compensate for the vehicle movement. In real world use it is a more aggressive V/R mode. Use Normal mode trackside if it’s just you moving the camera. However, if you are in a stadium is the “ground” moving under the influence of the crowd?
On newer lenses you have Normal/Sport. Sport mode is good for panning and when taking multiple images in burst mode. It is less aggressive than Normal. Use Normal for static subjects at distance when using a slow shutter speed. Sport mode will also not reduce your frame rate or shutter lag, it being less aggressive than Normal.
V/R will only compensate for camera movement. In our area of photography where the subject is moving V/R will have no influence on the subject, so you have to track it to get a sharp picture. See our article on panning.
Panning Photography a PistonClick Guide
V/R Off and Sport mode are the modes I use most of the time when using a long lens. On a monopod this setup is very stable so V/R is Off. When capturing a head-on image your shutter speed will be high, so no need for V/R. My panning is quite good so again not needed. Why off most of the time? V/R takes time to work you need to half press your shutter release for it to engage and it can get in the way of getting that shot if you need to take a very very quick shot.
When using a short lens hand held around the paddock I will use Normal, hand held trackside with a 70-200mm I will use sport mode. Practice with your kit to determine your best setup and how aggressive you want the V/R (Normal, Active or Sport) especially if your nick name is shaky Bob!
Final Motorsport mode settings in detail just before you shoot track side.
Set the shutter speed, aperture and check the ISO is correct, I use auto ISO.
White Balance. Correct for the lighting conditions. (Auto outside, sometimes this needs changing. Check with a test image)
Metering. Matrix.
Quality. JPEG Best.
Autofocus. AF-C (continuous) I refine this mode with the fine tune modes which are in the Menu > Custom Settings banks. I use Focus. This means the camera will only take a shot when it is in focus.
Exposure compensation set to 0.0 (-1 darker image +1 lighter image)
Take a test shot of the track and look at the histogram. Does it reach to the highlights and shadows with a decent peak in the middle? If not, investigate why. Check your exposure settings again, and consider exposure compensation and/or locking the exposure (AE-L button if you are using auto ISO) if you have very bright (sky) or shadows in the image. To do this, point the camera at an area of good even light, hold the AE-L button and recompose. If you don’t have a AE-L button you can map one from your Custom Functions menu. I use this feature a lot, for example when shooting motocross riders that are jumping above you as they will by silhouetted by the bright sky and not exposed correctly if you are using auto ISO. Alternatively conceder manual ISO.
So that is what I have in my camera bag, my camera settings that I use for taking motorsports photographs and my checklists. I hope you have found this article helpful and you get the photographs you want track side. If you have any top tips drop us an email.

You can share this report with your friends on Social Media using these links.
Do you like taking photographs and writing a few words? Get in contact, we need you!