
Basic camera settings for motorsports photography
When you got your first camera, be it mirrorless or a Digital Single Lens Reflex (DSLR), you were probably baffled by hundreds if not thousands of different settings that are available to you. In this guide we will look at the basic settings you can put into your camera to take successful motorsport photographs, they are:
- Shutter Speed
- Aperture
- ISO
- Focus Settings
We are not going to dive into the techno mumbo jumbo of the science and maths of photography as this is a basic guide so we will keep it simple and concise. The first point to keep in the back of your mind for now is that the Shutter Speed, Aperture and ISO are all linked, change one without changing the others will result in a badly exposed image. Hold onto that thought as you read on and we give you some tips on what settings to start with in motorsports photography using mainly manual mode.
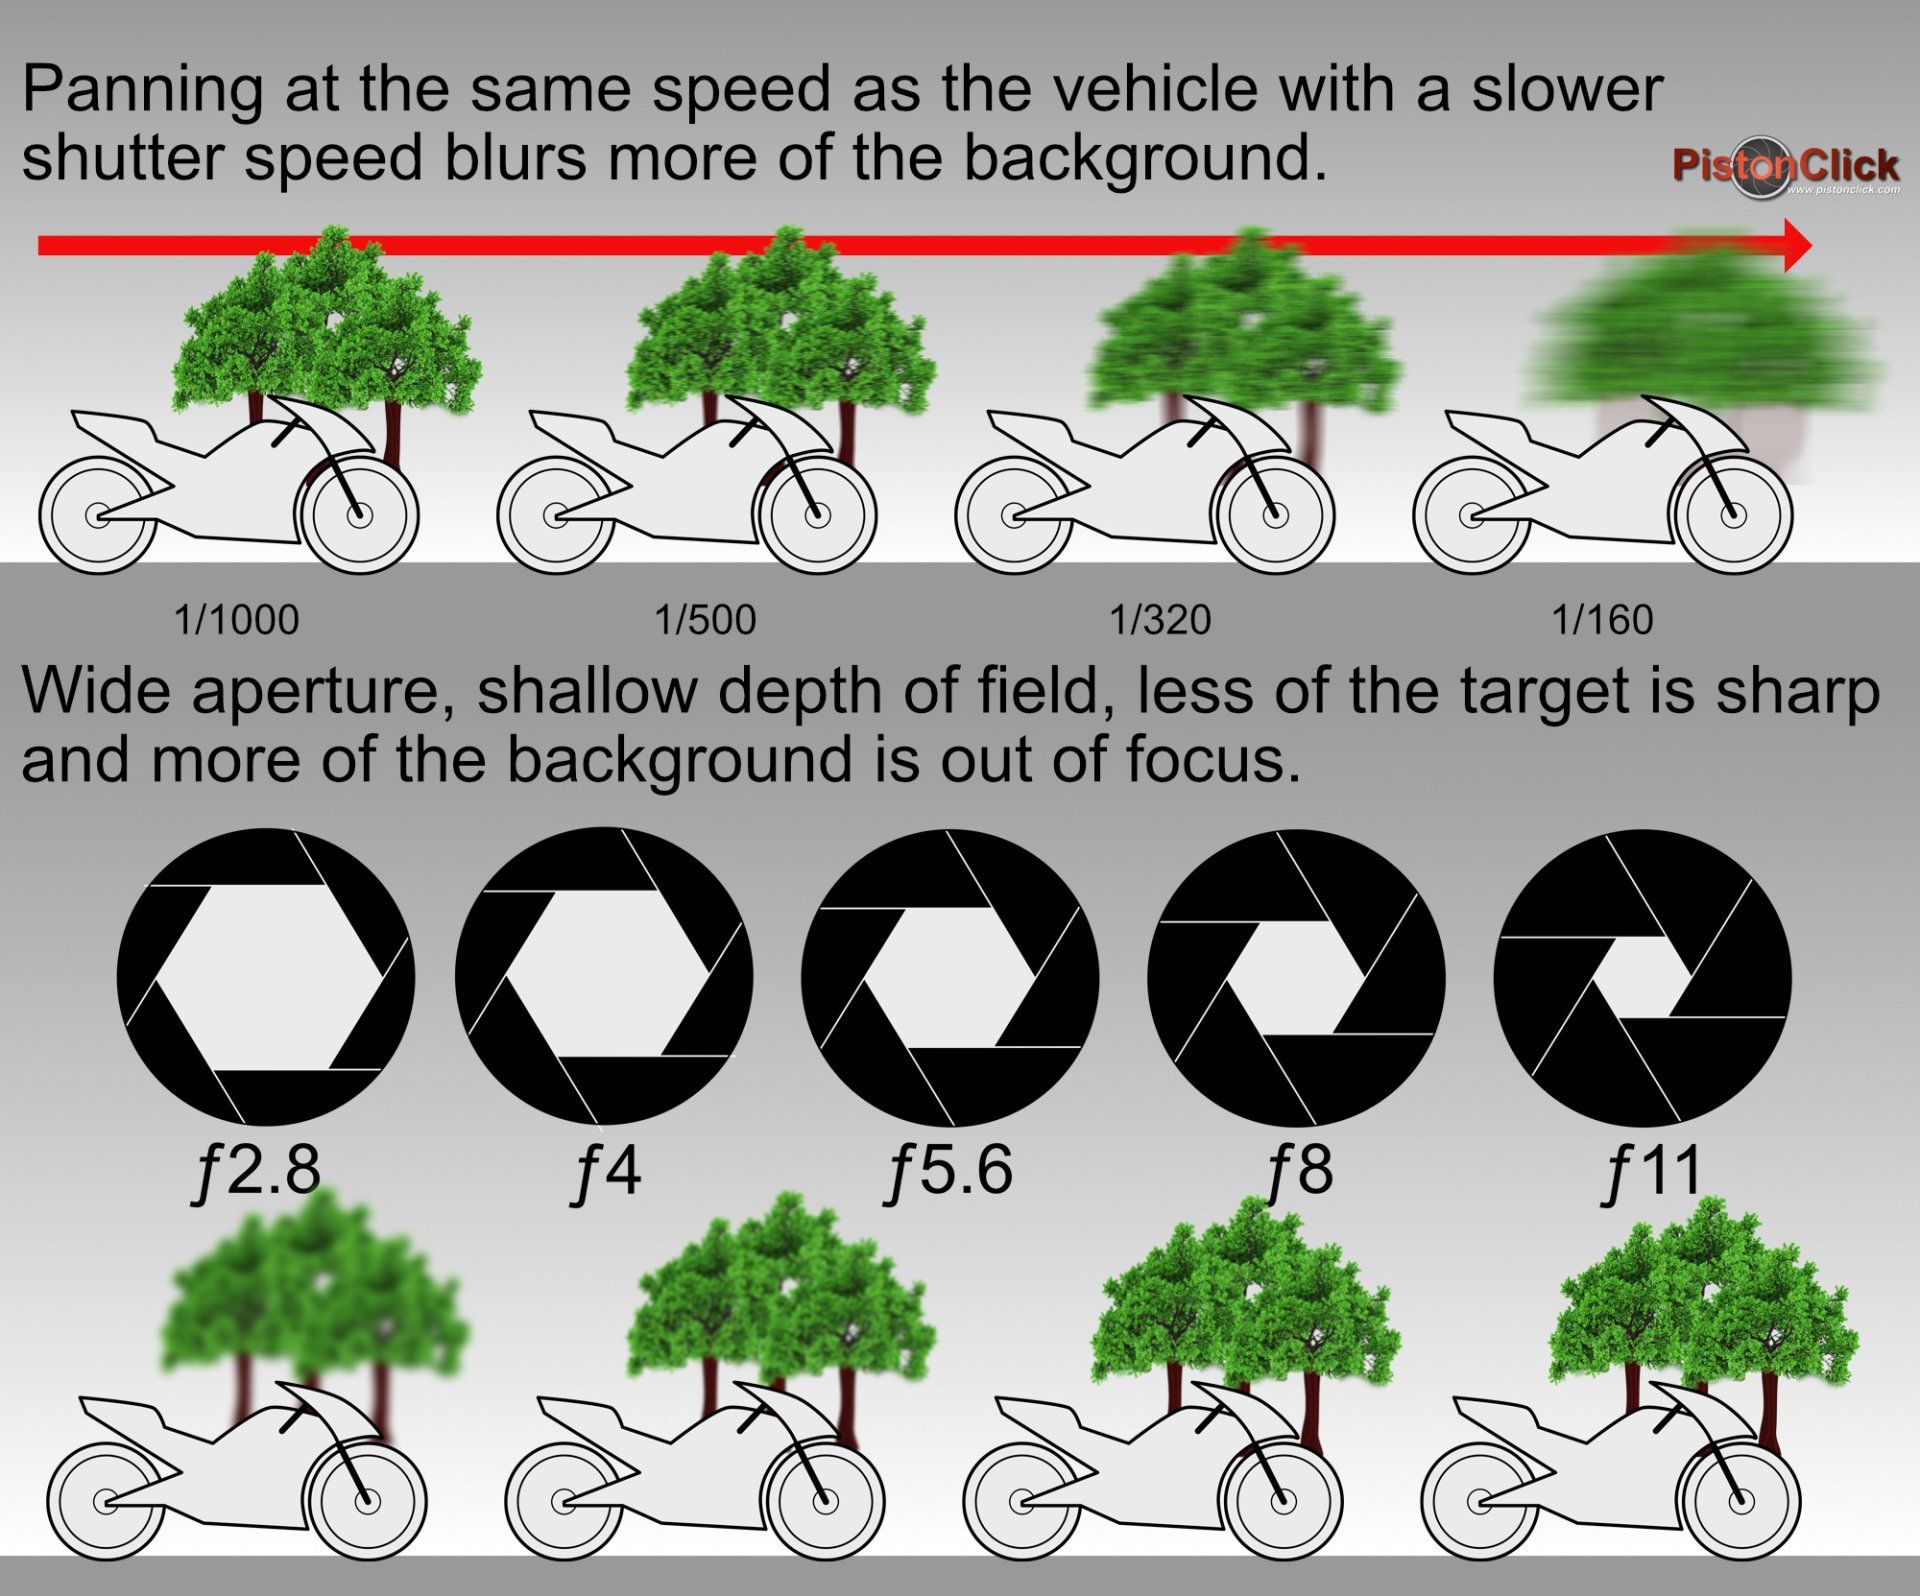
If you look at the graphic below you can work out for your self what settings you need to put into your camera to get a sharp clean image, 1/1000 of a second and ƒ11. But will it be a great motorsport picture? No it won’t, it will be nice and sharp but it will look like the vehicle is parked. So let's look at the basics of how to get a good motorsport image and the settings you will need.
Shutter Speed
So what is a shutter? Think of a old wooden shutter on a house window. When closed it lets no light in, but when open it allows lots of light into the house. Replace the house for a camera body and you get the idea. There are generally two types of shutter, mechanical and electronic, and both have pros and cons. Generally, electronic shutters make no noise. Great for weddings, but they do have problems when using flash and can bend the image - refer to your user manually for more details.
Motorsports photographers aren't bothered by the noise of a mechanical shutter so that’s the mode that most of us use. The speed that the shutters can be opened is set on your camera, fast 1/1000 sec will let in less light than a slow shutter speed of 1 second. In motorsport we will use very fast shutter speeds to freeze the action and slow shutter speeds to blur the background when we are panning. You can read up on how to pan in our PistonClick advanced motorsport guides.
Shutters are rated for the amount of times they are operated as having moving parts they will fail at some point. Most will work up to 200,000 clicks before needing to be replaced, so if you are purchasing a second hand camera check how many times the shutter has been operated. There are online sites where you can upload a photo and get that information, or you can look into the meta data via the software that you use to manipulate your images.
The shutter speed you require is dependent on the speed of the vehicle. A vintage Model T Ford running at 20mph will require a very slow shutter speed to get a similar result to a formula one car screaming past. The only way to gain this knowledge is experience. However, it’s unlikely you will be shooting cars running at 20mph on a regular basis at your local track!
Start at 1/320 of a second while you are panning (following the vehicle in the view finder), and gently start to press the shutter release button to activate the auto focus well before you want to take the shot. Once the autofocus has done its job, fully depress the shutter release and take the shot where you want to take it continuing to follow the vehicle as you take the shot or shots if you are taking multiple images.
For head on shots or action shots like motocross bikes taking a jump, a fast shutter speed is ok to use. 1/1000 and over will freeze the action. Remember, changing the shutter speed will need a change in the Aperture and ISO unless you are using auto ISO, but more on that later.
One thing to take away from this section is the faster the shutter speed the more static your shot will look, so use it to freeze the action. Slow shutter speeds will introduce more blur for panning, giving you a representation of speed. However, you will need to consider camera shake. Set a shutter speed that matches or exceeds the focal length of the lens, as this ensures the subject will be sharp with no camera shake. Use a 400mm lens 1/400 of a second shutter speed or higher. But as your skills improve you can ignore this statement to a certain degree and 1/320 will work when panning as you are moving the lens anyway.
Aperture
So what is an aperture? It’s an opening that you can vary the size of to allow different levels of light into your camera and adjust the depth of field - more on that later. Small hole, small amount of light, big hole lots of light, simple. However, focal ratio expressed as ƒ (not f) is part of the black hole that is the maths and science of photography. Apertures can be confusing. A big number ƒ11 is actually a small hole, a small ƒ stop number ƒ1.4 is big hole = lots of light. Think of it as a cake in fractions, a 1/4 of a cake (ƒ1.4) is much more than 1/11 of a cake ƒ11. ƒ numbers are not fractions but you get the idea.
So why don’t we just have a fixed aperture and let the shutter control the amount of light that enters the camera? This is now getting into the art side of photography as it gives us options on how you want the image to look. Besides letting light into the camera, in conjunction with the shutter, the aperture can help throw the background out of focus isolating your subject from the background. A wide aperture of ƒ1.4 will have a shallow depth of field with the subject sharp and the background out of focus. This is called Bokeh and when used correctly it can give very pleasing results. Bokeh is not only dependent on the aperture. The glass and the quality of that glass in the lens has a marked affect. Cheap kit lenses are not as good as expensive pro lenses in this respect. Also, a full frame sensor will give better Bokeh results than a crop frame camera.
Bokeh is not important when panning as the movement of the camera will blur the background, isolating your target. However, with a head on shot it might give you the results you are looking for. But a word of caution, a wide aperture (good Bokeh) will have a very small area in focus.
So consider your target. Side on not a problem, but head on, where are you focusing? The front of the hood or the windscreen, the rider's helmet or all of the motorcycle? To start with, let’s go for a nice safe ƒ stop of ƒ5.6. On a full frame camera with a long lens you will have over 5m of area you have focused on that will be within acceptable levels of sharpness. However, the depth of field is dependent on the lens length and the camera sensor size. A crop sensor camera with the same settings with be around 3.5m. You will need to experiment with your kit to get and understand the results you want.
One thing to take way from this section on aperture is depth of field. The point that you have focused on will be sharp with a near point and a far point that also has acceptable levels of sharpness. Changing the ƒ number (aperture) will increase or decrease the depth of field.

ISO
The ISO is the sensitivity of the camera sensor and is represented by a number. The term ISO has transferred over from the days of film. Most cameras start at 100 ISO and some pro level cameras can go to very high ISO allowing them to take an image in very low light conditions. 100 ISO is your basic everyday setting for taking photos in good lighting conditions, like a sunny day. As you get less light so you need to increase the ISO number to compensate, 200, 400, 800 and so on, increasing the sensitivity of the camera sensor to get the same image results in different lighting conditions. However, increasing the sensitivity also induces grain into your image. As a sports photographer I use auto ISO because ISO is one of the three settings you need to put into your camera to get a correctly exposed image. The other two we have covered Aperture and Shutter Speed.
To change the aperture and shutter speed, camera designers have incorporated two control wheels into your camera. The one on the front controls aperture and the one on the back shutter speed. To change the ISO, generally you have to take the camera away from your face and fiddle with buttons and in some cases dive into system menus. As a sports photographer you want to capture the action and be able to change your shutter speed very quickly if an incident occurs in front of you. Quickly flicking the rear control wheel to the right will increase the shutter speed, enabling you to freeze the action. As the ISO, shutter speed and aperture are all linked having one of them in an automatic role can help.
The Exposure Triangle

Focus Points
The last setting you need to consider for your motorsports photography is the focus setting. Two areas to consider here are the type of Autofocus (AF) that your camera was designed with and the AF area mode. The AF you get in your camera is better on pro cameras than semi pro and beginner models, so if you are looking to buy new, study this area of the camera and choose wisely. The thing to look out for is, will the AF work below ƒ8? This is important if you are considering teleconverters as they reduce the amount of light entering into the camera.
The one area you can adjust and fine tune is the AF area mode, which is how may sensors you want to use to activate the AF. You would think that more is better, and sometimes it is, but like setting everything to auto you are letting the camera make a best guess. I shoot in an old school way with nine or sometimes only one focus point. I move these round the sensor using a control wheel or selector button on the back of the camera. Why don’t I keep the sensors in the middle of the frame? Composition is key here. In the example below I wanted more of the background in the image. If the sensors were in the middle of the frame I would have probably focused on the second car, throwing the main subject out of focus.

To conclude, shooting in manual (changing the settings yourself) will give you the best results when taking motorsports photography, aperture and shutter. Using Auto for ISO lets you quickly change your aperture and shutter to get the results you want. Top Tip, keep an eye on the exposure meter in your view finder if you are making big adjustments, Auto ISO can only compensate so much before you under or over expose your shot.
A guide to taking motorsports photography
Our other articles on how to take stunning photographs at motorsport events including, panning, shooting through wire, locations, equipment, settings and much more.

You can share this report with your friends on Social Media using these links.