

Creative or capture motorsports photography - Part Two
18 February 2022
Creative photography
Creative photography can be defined as taking photos in a way that produces interesting and unusual results. In our previous report in this series we looked at capturing a moment in time - capture photography.
This is basically freezing the image, but a portfolio of just capture images generally doesn’t portray the speed and excitement of motorsports. A good selection of creative images will enhance your portfolio, and for me it challenges me and therefore improves my photography as I try different styles and techniques.
Creative photography can be sub categorised into two areas - in camera and post production. The in camera shot for me is the method I like to use to create an image that portrays the excitement of motorsport. Once mastered you can produce interesting and unusual results which speeds up your post production work flow.
However, we are all different, and digitally enhancing and adding elements to your images might be of more interest to you. The following is not a comprehensive list of styles and techniques, just a few suggestions for you to try out the next time you are track side to get your creative juices flowing.

In Camera - Panning
The most used creative technique in motorsports is panning, a technique used to capture motion blur and convey movement while keeping a moving subject sharp. I love a pin sharp subject in a panning shot but a blurred subject does have its place and can be quite effective.

So the basics. To get a good panning shot you need a shutter speed that is slow enough to blur the background. To ensure the vehicle is sharp you need to move your camera at the same relative speed as the subject and in the same direction. Sounds simple, but in practice it's not.
The first consideration is the lens you are using. A short focal length lens is easer to pan with than a long focal length. In the example below I used a 17-55mm lens set to 55mm at 1/50th second.
As the focal length increases you need to increase your shutter speed. Why do you need to do that? Well try it out now if you have the kit to hand. A 50mm lens will show little to no movement in the view finder, attach a 600mm lens and the image will be moving all over the place.
The movement at 50mm is the same as 600mm, it's just been magnified by the longer focal length lens and you are able to see it. If you can see it so can the sensor on your camera that produces the final image. Using a faster shutter speed will freeze the camera shake but will not produce that pleasing motorsports image you want. You need to mitigate the camera shake by introducing your own movement, panning.

The standard hand held technique for panning is to stand looking at the part of the track that you want to capture the vehicle. Then turn your hips and upper body to look at where the vehicle is going to appear, but don’t move your feet.
Bend you knees slightly, tuck your elbows in and track the bike by moving your upper body smoothly. Any movement up or down or tracking too slowly or too fast will compromise the picture.

The best results are when the vehicle is directly in front of you and further away. I see a lot of photographers up close to the track who have massive lenses.
If they were to stand back and use the reach of the lens they will see that the further they are away from a moving subject the slower it appears to move. This gives more time to compose the shot. If you are still struggling and not getting the results you want with the hand held technique there are a few options that can help you out.

The first one is vibration reduction that is built into most modern lenses and some camera bodies. There are various modes depending on the manufacturer, check your hand book or just go to the track and try them out and work out what is best for you.
For up to 200mm I don’t bother with VR, most of my lenses are that old they don't have it; for long range sniping I select a sports mode this is called Normal on a Nikon, active is used when you are moving like being in a vehicle. This reduces the VR in the camera viewfinder, helping you with tracking and also the image hitting the sensor. The electronics are smoothing out the camera shake, allowing you to have a much lower shutter speed but also not displaying the camera shake in the viewfinder, helping you judge the speed of the vehicle correctly.
There have been a lot of discussions on VR and sports photography and how useful it is. When VR first came out it allowed you to hand hold a long focal length lens at a low shutter speed. That was unheard of. These first generation VR lenses were not great at panning.
However, new algorithms have now been incorporated that detect that you are panning and compensate. I'm no electronics expert but at long focal lengths I get more keepers with VR on than off, so my tip is keep it on.

The second method is using something to stabilise the camera and lens. A tripod would be the best bet but not practical at the track, so a monopod is recommended. These require a very different technique to hand holding and a lot of practice to get it right.
I see a lot of people using them with the leg straight down. Great if you are freezing the action at distance or moving the camera a short distance, but If you try a long pan you will see the camera will move in a semi circular motion while tracking, going from low to high to low.
This will work but will not produce a sharp image all the time, although to be fair, if you are producing pin sharp images all the time you won't be reading this, you will be track side snapping Sir Lewis Carl Davidson Hamilton MBE in his shiny Mercedes-AMG! If you angle the monopod between your legs or away from you, then you can track in a flat plane. A tilt head on top of the monopod is required for this method and a fluid base will help a lot.

The shutter release is also very important. Snatching at the button will upset the smooth motion and induce more movement. My preferred focus and shutter release method is to map one of the buttons on the back of the camera for focusing, so I'm pushing forward not down at the initial focus point.
Combining this with continuous auto focus I will acquire the vehicle, press the back focus button, track the vehicle and then press the main shutter release slowly and follow the vehicle while the shutter fires.

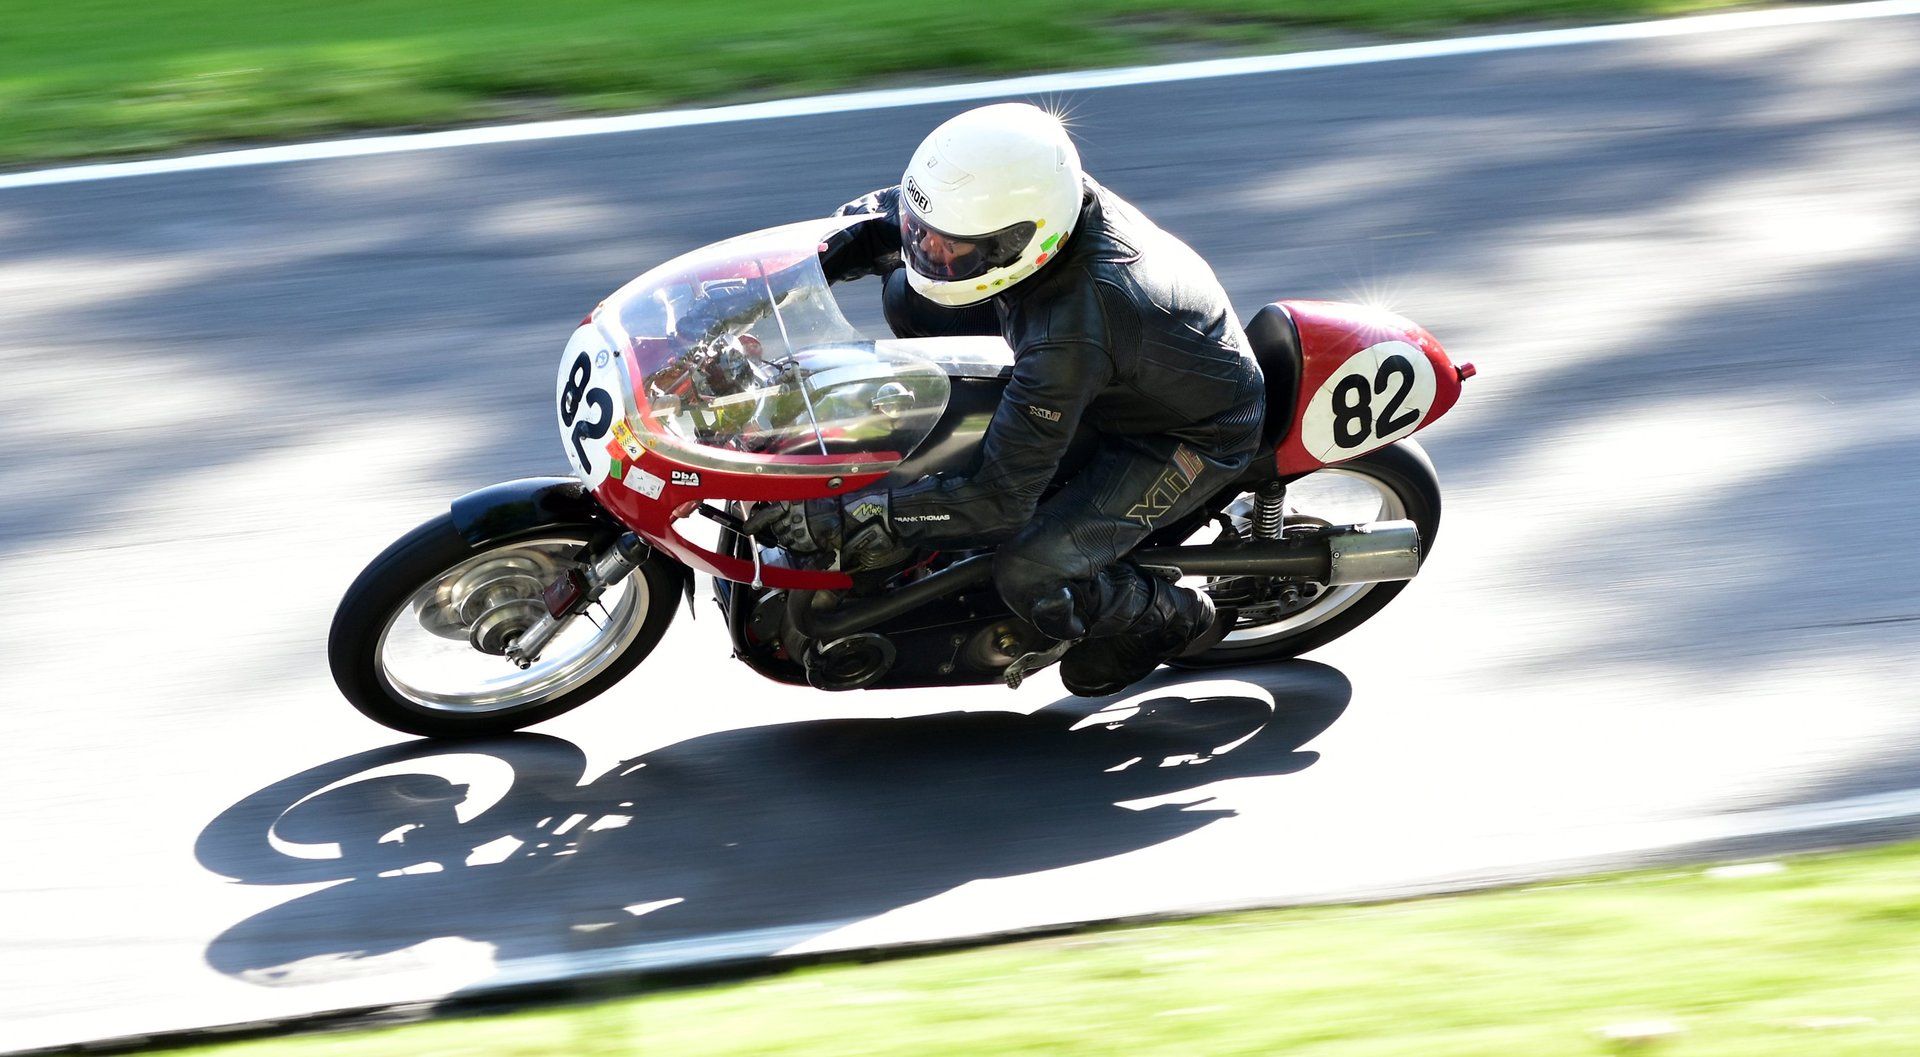
Now the sticky subject of the shutter speed. This depends on how fast your subject is moving. A classic car will not go as fast as an F1 car so will need a lot lower shutter speed. As a starting point for your settings, around 1/320 of a second will give you a reasonable amount of blur with a telephoto or a superzoom as seen in the picture below (the aperture, make sure you have enough depth of field, and ISO are dependent on the lighting conditions).
Once you have mastered that shutter speed, start to drop it down to induce more blur into the background. Don’t forget to adjust the aperture when you adjust the shutter speed or set the camera to S (Nikon) or TV (Canon) and let the camera's electronics sort the aperture for you, and don’t forget the ISO, auto ISO is what I use.

The last thing to consider is fatigue. Holding a large lens and camera combination all day will be tiring. You are not capable of holding a camera 100% stable at any time. The muscles in your body are always moving - it's how you balance. As they move you get tired so adding a few kg of weight to the end of your arms is going to speed up the process.
Take the weight off your neck and back as often as you can. This is where the monopod can help again. I do use a monopod for panning and it's great for carrying a large lens around and supporting it in between shots.
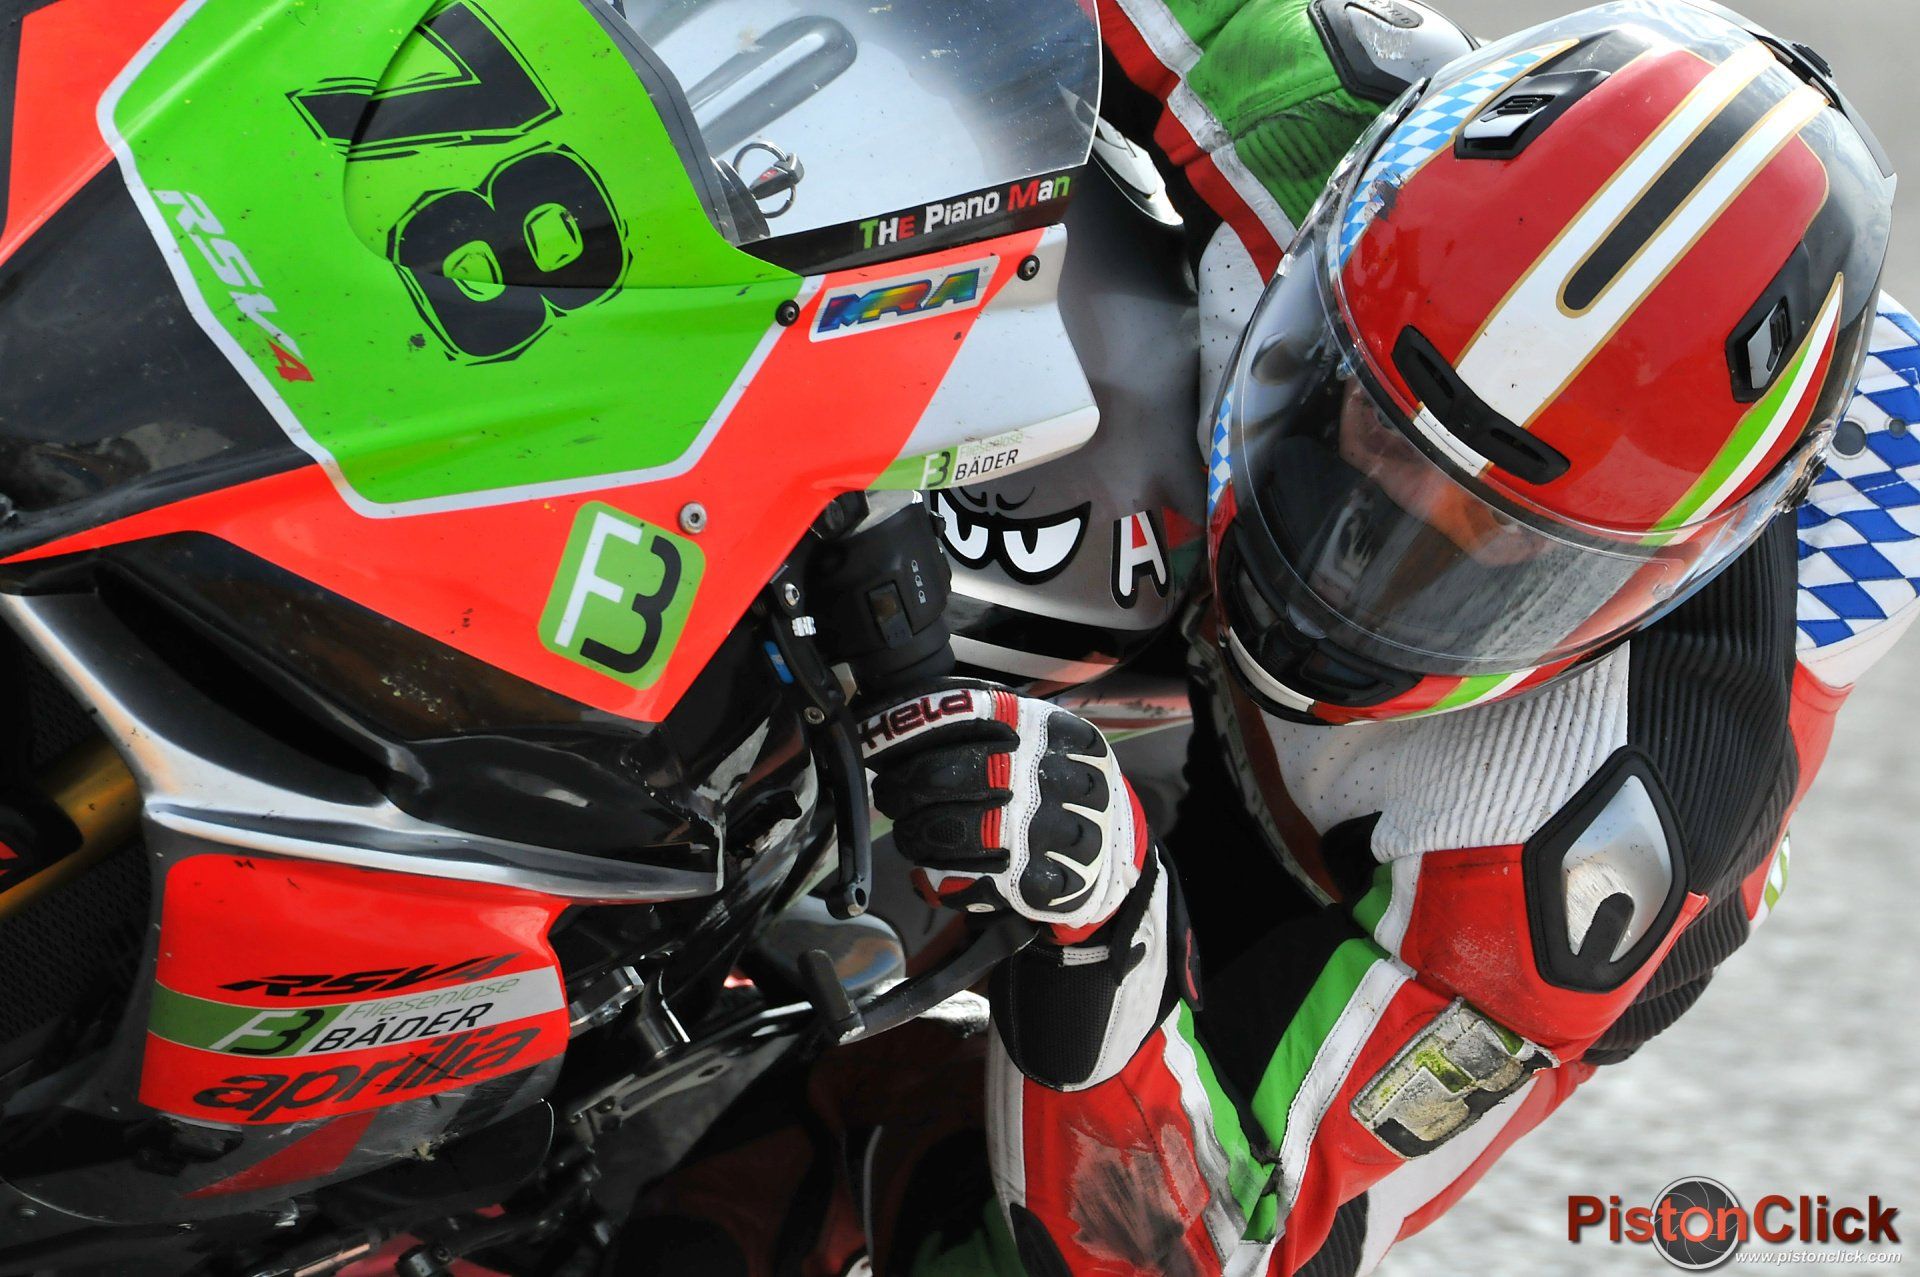
When you review your pictures don’t get downhearted when shooting vehicles, they are difficult subjects to capture successfully when panning. A rider will move around on the bike, so a lot of the time the bike will be sharp but the rider's head or body will not be sharp as he will be moving in a slightly different direction to the bike. In the case of the picture below all of that statement is reversed but still a great picture, they all don’t have to be 100% pin sharp.
There is not a lot you can do to mitigate that movement, but you can observe. When leaning over at 100mph in the apex of a corner the rider is trying to keep the motorcycle as stable as possible so won't be moving much/trying not to fall off. Find this sweet spot and you should get some great results which leads us into the next section, Focus on One Part of the Action.

Focus on One Part of the Action
Combining panning with focusing on one element of the action is a subtly different approach and there are two ways to achieve this effect. The first and easiest is to wait for multiple vehicles to come into view and track just one of them.
You have probably been doing this with out thinking about it. Next time you are track side make a point of capturing multiple vehicles in one shot. A slightly wider field of view, or if you prefer, a shorter focal length will help as will a wide aperture to throw the background out of focus.

The second is to reduce your shutter speed significantly and study the rider, or driver if in an open topped car, and seeing when their head is stationery, usually at the apex of the corner. This will only happen for a very short space of time so an element of luck is required.
However, the more I practice the luckier I seem get. If you are fortunate to be watching top flight motorsport it's much easer as the best riders and drivers will be hitting the same spot time and time again, club sport not so.
To take this shot you need to frame this shot and move your focusing point where the rider's helmet will be. Tracking the rider into the corner on continual focus mode is the easiest way. Standing above the subject gets the best results as the rider's helmet is closer to you than the machine, giving the desired affect. The closer a subject is to you, the less you have to move to keep it sharp.
Think of a playground roundabout, the children in the centre move relatively slowly compared the children pushing the roundabout.

Or you can just focus on one part of the action and go for a capture shot that is a little creative.


Or do what it says on the tin and Focus On One Part Of The Action.

In Camera - Using circuit furniture
Photograph scenes through gaps in the tree line, holes in the armco or incorporating the tyre wall adds atmosphere to the shot. When tracking a subject through trees it's helpful to turn off the auto focus (AF), pre-focus where you want to take the shot, then turn your AF off and follow the subject to the predetermined spot.
Pre focusing also stops you taking a handful of shots and only having one usable one, speeding up your work flow.


In Camera - Shadow
Taking images in bright sunny conditions can lead to high contrast and harsh images with little detail in the shadow areas and blown highlights unless you get the exposure spot on. However, you can get some pleasing shots with the shadow enhancing the image. Careful observation is required here, and an understanding of the exposure triangle.
Check your histogram in camera. If you have a high peak with the exposure not reaching the shadow (left side) or highlight areas (right side), adjust your exposure. You will need to be in manual to get it just right as you could be shooting towards he sun.


In Camera - Reflections
If the bright conditions are not to your taste give it an hour or two and the UK weather will change, and you can now start looking for standing water and reflections.

The other obvious area for reflections are shiny surfaces of which there are plenty when it comes to motorsport. Observation is the key here. Confession time, in the photo below I did ask the guy to move so I could get him in the shot.

When you get the right conditions you can release your shot while panning as the vehicle is opposite some standing water for an inverted image, or if standing in the rain is not your idea of fun go to Santa Pod, the track is always shiny.

In Camera - Use the wrong lens
Track side, all I see are superzooms. Most of us have other short lenses in our collections, so bring them along. It's much easier to pan with a short lens and the effects can be very pleasing. A much slower shutter speed can be used with a short lens, thus creating more motion blur in the background and in this case the foreground as well.

Post Production - Multiple exposures
Most of us will all take a series of shots especially when an incident happens in front of us, but consider incorporating them into one image. The examples below now fall into the post processing of an image. There are multiple ways of achieving this effect in your digital imaging programme. Blending and cutting out the image (selection) are the most commonly used ones.


Credit Piotr Maczka
There are loads of great guides on the internet on this subject, but in the image below I kept it simple by overlaying the images and erasing the areas I didn’t want. I have excluded about 50% of the original images for clarity as the bike was in the same place as it was flipping.
I had a chat with Andy Reid who was riding for the BMW Tyco team later that eventful day at Cadwell. He wasn't seriously hurt, limping away from this crash with just a bruised ankle.

Post Production - Colour Selected Areas
Many professional sports photographers have a fervent dislike of digital filters and image manipulation. This is because they see someone spending ten seconds applying a filter to a mediocre photograph transforms it into ‘art , and they do have a point. This practice is more relevant to the static side of automotive photography where the muted tones and washed out look is in vogue at this time. I personally think that digital filters do have a place, and if that is what the customer wants and it pleases you do it.

Credit Piotr Maczka
Part of the inspiration for producing this article was chatting to Piotr Maczka about colour pop images. Adding a pop of color to black and white photography draws the eye to a specific subject and separates it from the background. When this technique first came out it was done to death and went out of vogue for a while, but I have included it as a lot of people still like producing this type of image.
There are loads of different ways to achieve this look. One way using Affinity Photo is to copy the original image, convert the top image to black and white (from the main menu > Layers > New Adjustment Layer > Black and White) then use the erase brush or selection tool on the black and white layer to remove the image, showing the colour image beneath.

Credit Piotr Maczka
Piotr Maczka talks about his inspiration.
"During one of my visits to Oulton Park I met my friend who, just recently, had bought brand-new Harley-Davidson. We had a small chat and after a while I knew almost everything about his bike - engine spec, performance, dimensions. I even knew the left and right lean angle. Everything seemed perfect to me except one thing. The colour of his bike was VIVID BLACK.

Credit Piotr Maczka
We have all heard about importance of background in photography. We have heard about the best background and a blurry background. We know that background is extremely important. I even had a project called Monet where background played fundamental part of a photo, but what if we forget for a moment about a background and focus our attention only on a main subject.
Just like a single AF point. In that very moment when I am panning my shot and I press a shutter button I "see” only VIVID ON BLACK.

Credit Piotr Maczka
I always thought that I have a vivid imagination, but even when I have looked at that bike, it was hard for me to imagine that a word “vivid” which describes a bold and bright colour can be used in conjunction with “black”, but it gave me an idea for the pictures you see here."

Post Production - Apply a digital filter
There are loads of different plug-ins you can add to your digital manipulation software to enhance your images, from noise reduction and sharpening algorithms, to photo filters that can entirely change the look of your image. The specialist noise reduction and RAW processors are not what I would classify as creative so I'm going to park them.

Photo filters on the other hand can help with creative photography. They are all slightly different but do the same thing, enhance or desaturate the colour, change the colour balance and apply effects like vintage photo. If you have the time you can produce pre-sets yourself and use them time and again. There are loads of sites and videos on the internet that can help you in this matter.

The only plug-in I have is the NiK DxO collection. It used to be free but now you have to pay, but it does come up on sale now and again. I don’t use it too much as I feel a lot of photos online are over worked, mine included on occasion. I have played around with the NiK collection and have saved a few pre-sets (recipes) that I made myself for specific work.

The bottom image below uses three of the NiK collection pre-sets that I have adjusted and combined into a recipe, Pro Contrast, Tonal Contrast and Bleach Bypass. For me the image works. However, not everyone will like your digitally enhanced image. Just like art, some prefer fine art, others prefer pop art.
Just keep in mind that less is more when it comes to digital manipulation, don’t over work it and go gentle on the vibrancy and vivid sliders.

Post Production - Digital manipulation
This is the daddy of creative photography and is only limited by your imagination. This area is one I like to dabble in, but I'm far from being an expert on the subject. But fortunately there are loads of helpful people out there who will post how-to videos and guides to help you out.

When I'm out and about I keep an eye out for a shot that I can play with when I get in front of the computer and have a bit of time on my hands. The big indoor shows like Autosport and Motorcycle Live are rich pickings for this type of project.
The shots you will get at these shows are busy with loads of people and messy backgrounds behind the subject. Those pictures have their place, but you can do so much more with them.

This shot of a BMW is still a work in progress. Besides being cut out of the original image there doesn’t seem to be much else going on, but look closer. A lot of the distracting highlights have been removed from the car using the clone tool.
This tool is well worth investigating if you shoot at an MSV track. It's great for quickly getting rid of the red bins that litter the track side.

These shots from Autosport were manipulated using Affinity Photo (other software is available) and placed on a stock background. A slightly different stock image was used for the floor, dragged out using the perspective tool and a thick black line with the opacity lowered and blurred added to hide the join.
Lighting effects were added to the left, and the brush tool used to apply the shadow below the car and to the right, again opacity lowered and blurred. Some .png (gives you a clear background) graphics from the internet and you are done.

Photographic Post Script
The two guides to taking motorsports photography have been written from my point of view. They detail how I like to approach my trackside photography. I hope you have enjoyed these articles but they are not a definitive how-to, more of an inspirational read to get your creative juices flowing next time you are trackside.
One thing I haven't done is included my camera settings. This is something we get asked to provide with our images. However, as you progress in your photography you will understand that the setting you use one day will not be the same the next. The aperture, shutter speed and ISO will all need to be in harmony to produce a correctly exposed image, depending on the lighting conditions. As we know in the UK, the light can change by the hour never mind a different day or even time of the year.
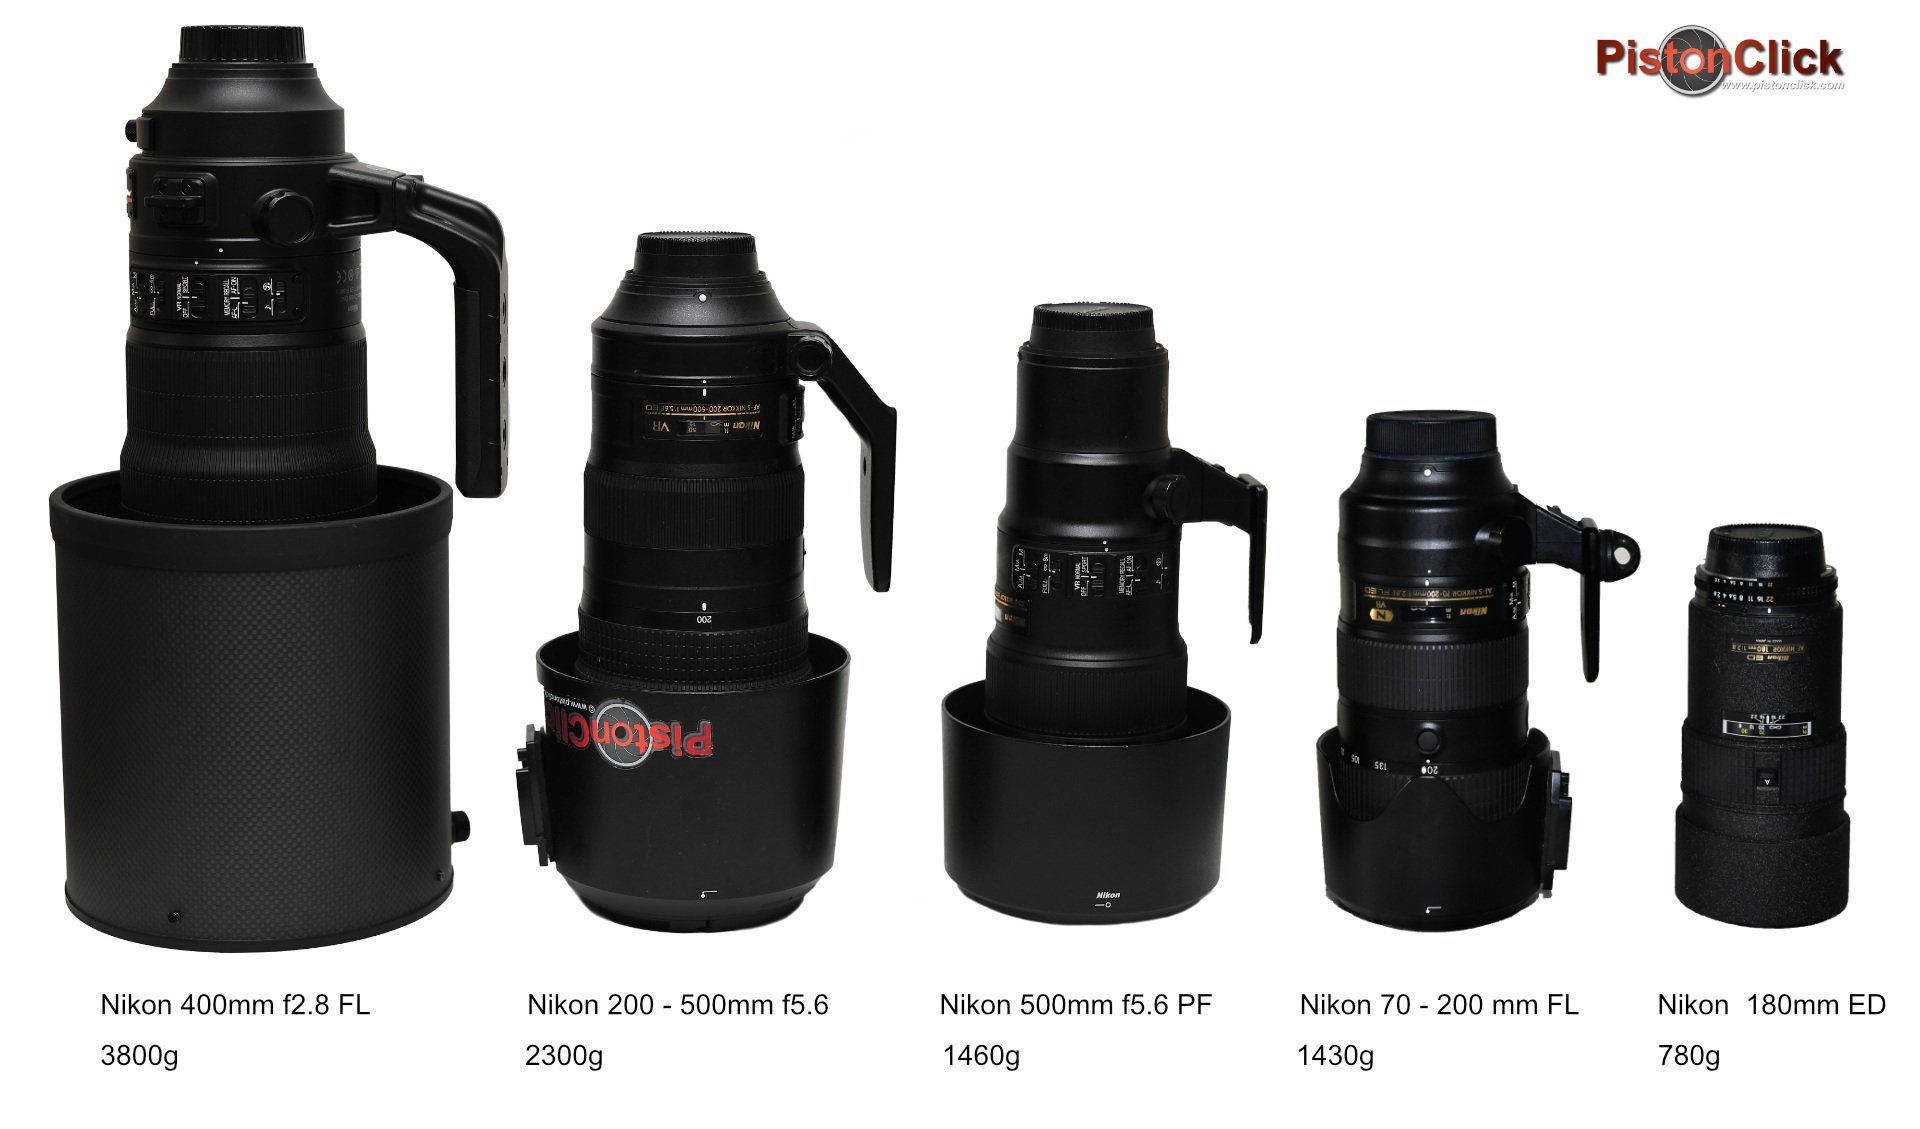
Also your lens and camera combination will affect your settings. All lenses have a sweet spot for sharpness, usually 2 - 3 stops down from the maximum aperture, so if your lens is f2.8 a setting of f5.6 - f8 will probably produce the best results. But if you are shooting in reduced light you might have to open the f stop from the sweet spot to let in more light, especially if your camera don’t have a large range of ISO settings.
Combine that with a teleconverter and any filters like a polarizing filter and the combinations can be huge to produce a similar result.
My top tip. Get trackside, shoot, review your pictures, enjoy the racing and when you get home analyse your pictures on your computer, then get trackside and repeat, practice makes perfect, I'm still practicing.
If you missed our first report on Capture Photography the link is below.

Motorsport - Panning

Motorsport - Shooting through Safety Fences

Motorsport - Camera settings

Capture Photography
A guide to taking motorsports photography
Our other articles on how to take stunning photographs at motorsport events including, panning, shooting through wire, locations, equipment, settings and much more.

Thanks to Piotr Maczka for helping out on this report. You can share it with your friends on social media.