Affinity Photo for the iPad

Affinity Photo for the iPad beginners guide

Affinity Photo for the iPad


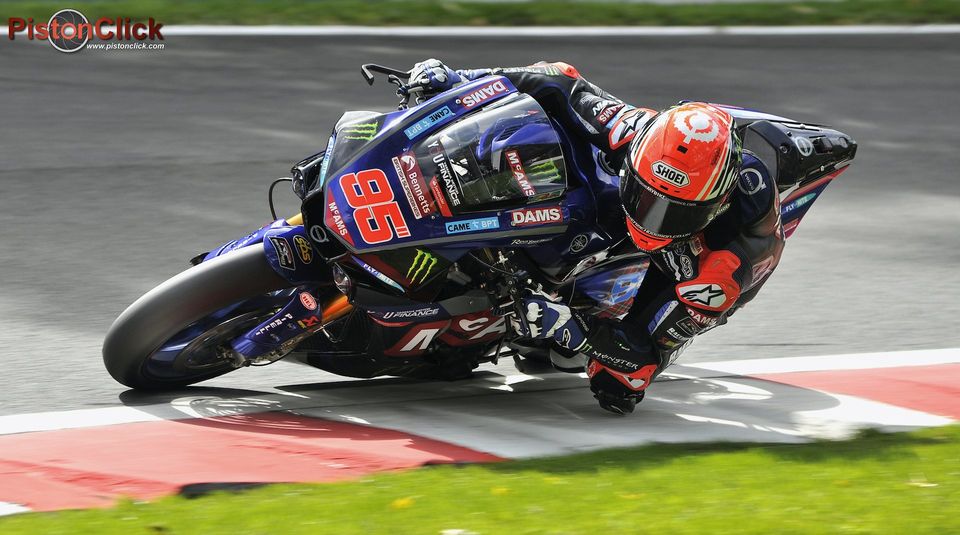
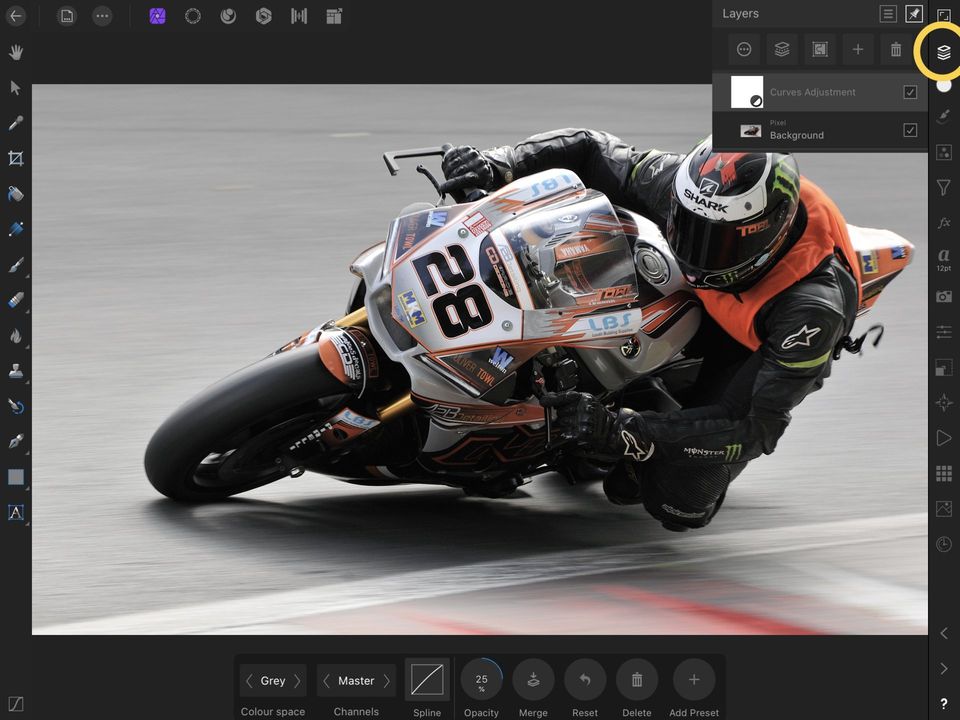
In this report we are going to look at one of the leading photographic software packages for manipulating your images, Affinity Photo (AP). There are other packages available including the free tool sets that came with your camera. For this report we will just look at AP and specifically the iPad version and how the sports photographer shooting .jpg can get the best from their images. All of the pictures seen here have been edited with AP Desktop and iPad versions.


Just like your choice of camera, most photographers will pick a brand due to loyalty which isn’t a bad thing but can get you in a rut. From time to time it’s worth evaluating other options especially when it comes to imaging software as the big brands are always improving their products.


I have been using the desktop version of AP for a few years to edit my motorsports photography combined with a graphics tablet. So when Serif had a sale for the iPad version, in my mind I now had the graphics tablet and software combined in one neat package, so I took the plunge. For less than £20 pounds direct from the Apple App Store it looked to be a bit of a bargain to me. And I was intrigued to see if a tablet based option using the Apple Pencil was a viable alternative for the sports photographer on location. As of May 2020 Serif have a deal on at this time £9.99 for the iPad version and £23.99 for the desktop Windows or Apple version. 

Affinity Photo for the iPad beginners guide
If you read no more of this report I can tell you it is a viable option. Some of the desktop functions have been changed to to accommodate the unique features of a tablet. Pressing and holding and tapping with your fingers or a pencil can replace right mouse clicks and the like. It can be a little confusing to start with but once mastered your workflow can be very quick on a tablet. 

But why even edit on an iPad? My iPad Pro is the 10.5ich model and has a splash proof ruggedized case with a screen protector. I have been to a few events last year where I have been away from home for up to ten days and in locations when plunging into mains power was challenging. 

With a power bank and the great battery life you now get from a good tablet I am able to download my pictures and start editing anywhere, even in austere locations that I wouldn’t dream of taking a high end laptop.
Affinity Photo for the iPad beginners guide
You will probably not need to, or even want to do this, but one neat trick is the ability of most modern cameras to generate a WiFi signal. With your tablet in your backpack and linked to your camera over WiFi your pictures can be downloaded as you shoot. When you have a break in the racing you can review your images and upload them quickly to the internet, if your tablet has a sim card and internet connection. 

This process can also be achieved with the Nikon Snap bridge software but I've never had consistent results with it and waste time sorting out missing images, which defeats the object. You can also transfer to your smart phone if you don’t have a tablet. 

If you don’t have a WiFi enabled camera to get your images onto your tablet you will need to purchase the correct cable. I use the USB cable that came with my camera attached to a lightning adapter which works fine. Connect the camera and turn it on, your images should now be imported into Apple Photos, however the speed of import can be very different depending on the camera attached. 

My Nikon D3X is very slow whereas the much more modern Nikons are a lot quicker. This is no big deal if you are using an old school DSLR, just grab a cup of tea and let it do its thing or buy a Wi-Fi card for your non Wi-Fi Nikon.
Affinity Photo for the iPad beginners guide
So why do I use AP and not the market leader Photoshop to enhance my photography? It’s quite a simple decision for me - it was the cost. The full price for AP desktop version recommended retail price is less than £50 and this one off payment also includes updates to the software, I presume until a fundamental change is announced. So for not much money I can look forward to quite a few years of trouble free editing. 

PS on the other hand is now a subscription based programme that has the Adobe family of associated software available to the subscriber via the cloud. There are a number of different packages with online storage available starting from £9 a month. Sounds like a bargain and you are getting a lot of extras but after a few years the costs do start to accumulate. So for the photographers keeping an eye on the budget AF is a cheap alternative. 
Having said that, one thing that is missing from AP is a Lightroom type programme to view all of your images. AP gets round this by integrating with Photos, the Apple software that comes free with every Macintosh device. It’s then quite simple to select your photos to edit by selecting the + symbol from within AP and scrolling through your pictures. 

It’s even easier if you have placed them in albums. It goes without saying that all of the cloud solutions are supported, like Google Drive, Dropbox, HiDrive and iCloud.

So let’s look at why I picked AP. I’ve used PS ever since it first appeared, in fact the company I used to work for sent me off to London to do a three day course on PS when it first came out. I remember it being a mind blowing experience at the time and was slightly annoyed that the skills I had honed over the years as a photographer working in a dark room were about to be thrown in the bin. 
Technology such as PS and clever in camera algorithms were designed to make taking a photo easer, and at the beginning of the digital age they did and still do now. However, as time marched on more and more features were added to your camera and your software. Have you kept up with the changes and do you know how to use all of the features of your imaging software? Probably not, but you are paying for all of these extra features.

Newer is better right? Well yes it is but are you as a Pro / Semi Pro or amateur photographer going to use all of the features of a high end photo editor? The short answer is no. Graphic designers and artists who are making a living from those skill sets will, but as a sports photographer you probably won’t. So why shell out your hard earned cash on an expensive programme you are not going to use? It’s like buying a Lamborghini and only using first gear., 
Affinity Photo for the iPad beginners guide
There are only a few functions you really need in a photographic software programme to enhance your images as a sports photographer, and only a few more to have that are at the higher end that will be useful for you. We will look at some of the specialist features of AP in future reports.

What we will look at now are the basic tools that I use 90% of the time to clean up my images for clients, publication to this website, Instagram and Facebook. What do I use for the other 10% of the time? Nothing - the image goes from camera to client. 

As a motorsports photographer on a paid gig, occasionally you will need to shoot and send with not even a crop applied to the image. The ability to do this will set you apart from the pack and takes a lot of practice.
Affinity Photo for the iPad beginners guide
Opening your image

Open / import. To start with you will need an image, tap the AP icon on your iPad and you will be presented with the screen to add your image. We will use a yellow ellipse / circle to guide you in this article, locate the + symbol and tap it. 
Affinity Photo for the iPad beginners guide
Load. You will now have multiple choices, Import From Photos is where 99% of your photos will be, and if you have put your latest work in an album they should be easy to find, tap the icon you want. 

You might have imported your images to a folder on your iPad or even have them on the Cloud. The next screen will look a little different to mine it depends on what you have on your iPad, Recents, Favourites, selfies and the like, tap where you saved your image then tap the image to load it into AP.

Now this is where the fun starts. Before you dive in look at your image and decide, what do you want to do to it? This is important as not having an objective will mean you will probably over edit your shot. 

Is the subject placed in the frame correctly? No - get editing. 

Did you get the exposure right in camera? Do you have a good white and black with a good tonal range in-between? Or have you underexposed your image so there is no detail in the shadows, or over exposed so the highlights are blown? No - get editing.

However, you can only do so much with a badly exposed image, therefore you are not getting the detail back as you haven't captured it to start with even if you shoot in RAW.    
Affinity Photo for the iPad beginners guide
Basic Editing.

Crop. Select the crop tool - you should now have a grid over the image. If you can't see the full picture use two fingers to pinch the image smaller. Place the subject matter in the area of the picture that is most pleasing to the eye by tap and holding the crop tool corner and dragging. The rule of thirds comes into play here. Try not to place your subject in the centre of the frame. It’s much more pleasing to the eye for the subject to be off centre and try and place the main parts of the vehicle on the thirds intersection points. 

The crop tool also allows you to rotate the image. Is the horizon straight? If not, there is a tool in the crop menu located at the base of the image. Select it, tap and drag a line on the horizon and AP will auto rotate the cropped image. Or tap, drag just outside the image to rotate it manually. This menu has a lot of features for ratios and grids. Take a look - how you set it up will be down to personal preference, tap Apply to crop the image.
Affinity Photo for the iPad beginners guide
Exposure. It’s always best to get the exposure right in camera but you can sort any minor issues out in post processing. There are numerous ways of adjusting the exposure, but the first thing to do is look at the tonal range. Do you have a good black and a clean white in the picture? Not sure? I would recommend opening the histogram, curves or levels and seeing if your exposure reaches the far right, highlights and the far left, shadows of the graph. 

Tap Adjustments Studio then Curves then tap Spline in the sub menu to reveal the histogram. You can add nodes if you are in curves to adjust specific areas of the image to modify the shadows, mid tones and highlights separately. Experiment, it’s non destructive so you can always revert back to the original. 
Affinity Photo for the iPad beginners guide
Layers. You might have noticed that when you selected a curve that a new layer appeared in your layers pallet. In that pallet is a trash can. Don’t like what you see? Trash it and start again or to undo what you have just done one step at a time tap the < bottom right of the screen. Top tip number one, if you are trying to do an adjustment and it’s not working, look in the layers panel. Make sure the layer you want to adjust is selected and highlighted. 

Imagine you are looking down through the layers, the bottom layer is your original image the layers above it will be the adjustments you have made. The image on the screen is displayed as if you are looking through the layers. Click the tick marker to turn the layer on and off to see how your adjustments are affecting the image.
Affinity Photo for the iPad beginners guide
Dodge and burn. After adjusting the overall exposure you will find areas on the image that need a little more work. In this example the motorcycle is tilted towards us so the left side is in shadow and darker than we would like. We need to dodge that area. 

The terms dodge and burn come from the days of wet film using an enlarger. The light source would shine through a photographic negative, focused by a lens onto light sensitive paper. If we wanted to lighten an area on the paper we would dodge that area by putting our hands, bits of card or cotton wool on a thin peace of wire to mask the area and therefore reduce the light falling on the paper. Burning is the opposite, a hole would be punched in a piece of card and the light shining through would burn in a small area on the paper (more exposure) making it darker. These tools work on the same principle.

You can select the dodge and burn tools from the left menu and lighten or darken areas on your image. The lollop shown here is the dodge tool, the burn tool is depicted by a fire symbol revealed by taping the dodge tool. Remember to select the image in the layers pallet. 

However, this is destructive as you are working on the main image and it can be difficult to undo later in the edit. There are many ways to accomplish non destructive dodge and burn. My favourite is a little complicated but It can be helpful later in the edit if you need to adjust what you have done.
Affinity Photo for the iPad beginners guide
First select a pixel layer from the layer pallet and add it with the + symbol. 
Then select the colour pallet, Grey Slider and move the slider to 50% grey.
Affinity Photo for the iPad beginners guide
Make sure the pixel layer you have just made is selected and Flood Fill that layer with the 50% grey. 
Go back to the layers pallet and tap the three dots and pick overlay, you will now see your image. 
Affinity Photo for the iPad beginners guide
Select your dodge tool paint on the 50% grey pixel layer to lighten the areas that are in shadow. To further refine your adjustments you can select shadows, mid tones or highlights from the dodge menu tool set. Use the same process for burning in (darkening). Try changing the size, opacity and hardness of your brush that suits you best.
Affinity Photo for the iPad beginners guide
Colour, vibrancy, clarity and contrast are probably the most misused tools of any imagery manipulation software. My advice would be keep your adjustments very low on all of these tools, less than 10%. However, it’s good to have a recognisable style to your images. Some like dark and muted. I like clean and bright. 

Clarity can also help with sharpening, mainly the mid-tones and can be found in the filters studio. The rest are in the adjustments studio. 

Not sure where these are? Press the ? Bottom right of the screen.
Colour. The HLS colour wheel lets you target specific colours. In this case we want to enhance the red kerb stone. This is as simple as picking red and adjusting the slider. You can also pick a specific colour with the dropper tool. 

As with the vibrancy and clarity tools, keep the adjustments under 10% or it will be obvious what you have done to the image and you can induce artefacts like a halo affect around your subject if you go too far.
Affinity Photo for the iPad beginners guide
Sharpening. There are many ways to sharpen your image in AP. I use the high pass filter as I like the control it gives me. The idea here is to sharpen edges. Cars and motorcycles have panels, numbers and sponsorship logos. You can give the impression of a much sharper image that you had by enhancing these areas. 

Select the layer you want to sharpen, usually your original image, then the filters studio from the right menu and pick add live filter then high pass. 
Affinity Photo for the iPad beginners guide
The image will now appear grey. Adjust the radius until you can just see the areas you want to sharpen. The high pass layer should be below the original image you are adjusting. 
Affinity Photo for the iPad beginners guide
Selecting the high pass filter in the layers menu, three dots allows you to pick a blend mode. Pin, vivid and hard light all work well. You can experiment with opacity to get the look you are after.

The last task to do would be to place a watermark on your image. I will cover how to make a watermark from scratch in the next article and how to embed it onto your image. You can follow us on our Facebook page where we will let you know when the article is published.
Affinity Photo for the iPad beginners guide
Exporting your image

Happy with your image? Exporting your picture is dependent on where you are showcasing your image. For this report we will look at a web based option. Select the documents icon and export. 
Affinity Photo for the iPad beginners guide
You are now presented with a lot of options which we will briefly take a look at. The format of the image is important for web work, and there are two basic types, JPEG and PNG. 

Exporting as a JPEG file will result in a smaller file size and a loss of detail depending on the compression you apply. This format uses a lossy compression algorithm. The PNG file uses a lossless compression algorithm and therefore will have no detail lost. However the JPEG will load quicker, a PNG file will be better quality but a larger file size.
Affinity Photo for the iPad beginners guide
Talking about quality, let's take a quick look at DPI (Dots Per Inch, the amount of ink in an inch) and PPI (Pixels Per Inch, the pixels seen on your monitor). DPI is used for an output device printing your pictures and PPI is the size of your image (resolution). Kind of the same but not, but just about everyone has confused these two terms, with most people are using dpi to cover both. 

Image output for anything but web work is a complicated subject and beyond the scope of this article on basic editing. In short if you are producing an image for print it is best practice to export at 300dpi and for web based images 72dpi. 

For websites, often the pictures are restricted in the image size and resolution you can upload. Check with your provider. For this site it’s 2200px longest side and 72dpi….. an algorithm auto re-sizes the images regardless of the image dpi sent to me. 

I have asked the PistonClick hoisting providers to allow higher resolution image up load but this is not going to happen any time soon. I requested this to future proof the site as a lot of monitors are much higher resolution than the old industry standard of 72dpi, some smart phones are approaching 500dpi!  
Affinity Photo for the iPad beginners guide
Social media image sizes

Social media platforms also have the same type of algorithms to auto resample and re-sizes the images on upload. So its best practice to get the image size correct before you upload as this will mitigated the damage done to the image when its resampled.

For Facebook a PNG 2048px longest side will give you the best quality but a JPEG with the same dimensions will also be fine. 

Instagram also has algorithms that will up and down size your image so it’s worth getting it right, 1920px .jpg longest side is best. Instagram doesn't allow .png files.

Just to confuse matters you will get the choice of compressing your images to make the size in Megabites (not the length of the image or the resolution) smaller before you export them if it is a jpeg. You can get good results down to 70% these days but just compressing the image at 95% can dramatically reduce the size of your image and retain the quality. 

Rename the image from Untitled.jpg and save the finished picture into a folder buy tapping OK, then share the image into photos. This will allow you to directly post your well edited image to Facebook, Instagram and the WWW with a few clicks. Or you can use the Share icon bottom left of the screen.

That concludes our basic look at Affinity Photo on the iPad. In our next article we will look at the same process on the Desktop version and then watermarks, follow us on Facebook to get the latest updates.
Affinity Photo for the iPad beginners guide
You can share this report with your friends on social media.
Share by: